Check this link as reference :
https://devcenter.heroku.com/articles/deploying-a-parse-server-to-heroku
A Heroku account is required, sign-up for free.
If you don’t have an account on Heroku, you need to setup an account filling up the details. For ‘Pick your primary development language’, chose Node.js. Just follow the instructions as they come and setup an account.
After you setup your account and when you login, it will show the dashboard.
To create a new app, visit the Heroku Dashboard and select “Create new app” from the drop-down menu.

Incidentally, you need to give your app name every time you create a Parse app. This name wont appear publicly and its just for your own reference.
Click the Resources tab, then select and install the MongoLab add-on.
Follow the instructions from the link.
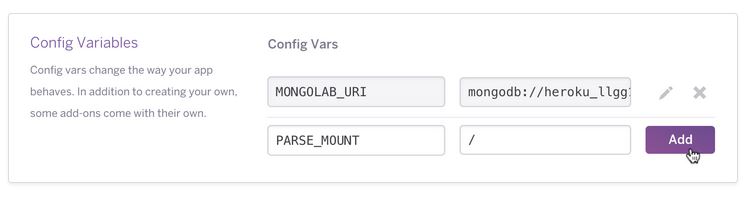
Configuring your Parse server with config vars
The Parse server is configured during instantiation. The index.js file in the parse-server-example specifies defaults, which are superseded by config vars, made available to our application via environment variables.
You can edit config vars from Settings tab in Dashboard:
With all this, the heroku configuration is done.
From this below link :
http://www.robpercival.co.uk/parse-server-on-heroku/
Download Parse Starter Android Studio Project and open the project in Android studio.
Sample code:
public class StarterApplication extends Application {

  @Override
  public void onCreate() {
    super.onCreate();

    // Enable Local Datastore.
    Parse.enableLocalDatastore(this);

    // Add your initialization code here
    Parse.initialize(new Parse.Configuration.Builder(getApplicationContext())
                    .applicationId("instagram45963")
                    .clientKey("instagram1234QWER")
                    .server("https://instagram45963.herokuapp.com/parse/")
                    .build()
    );

      ParseObject gameScore = new ParseObject("GameScore");
      gameScore.put("score", 1337);
      gameScore.put("playerName", "Sean Plott");
      gameScore.put("cheatMode", false);
      gameScore.saveInBackground(new SaveCallback() {
          public void done(ParseException e) {
              if (e == null) {
                  Log.i("Parse", "Save Succeeded");
              } else {
                  Log.i("Parse", "Save Failed");
                  e.getMessage();
              }
          }
      });


      ParseUser.enableAutomaticUser();
    ParseACL defaultACL = new ParseACL();
    // Optionally enable public read access.
    // defaultACL.setPublicReadAccess(true);
    ParseACL.setDefaultACL(defaultACL, true);
  }
}
Alternate resource :
Installing Parse Dashboard :
To install Parse dashboard, we first need to install node.js on our system.
After you install it, go to the command prompt and run this command : “npm install -g parse-dashboard”
It will install parse dashboard locally on your system.
To run parse dashboard, run this command on command line :
D:\Professional\Dev\Android>parse-dashboard –appId instagram45963 –masterKey instagram1234QWER –serverURL “https://instagram45963.herokuapp.com/parse” –appName instagram45963
Generally, the dashboard will start at address : http://127.0.0.1:4040/
You need to keep the terminal window open to keep running the dashboard.
