Will learn :
- Understanding
FragmentTransactions - dynamically managing fragments within an activity,
- implementing back button behavior, and
- monitoring user interaction with the back button.
The idea is to create interactive UIs that use fragments to dynamically change the appearance of the screen in response to user actions.
Intentional screen management
[Problem case]
Until now, we’ve considered each activity to always correspond to a single screen in our application. We used fragments only to represent subsections within each screen.[ Change this thought process ]
Example, let’s think back to the way we constructed our book browsing application. In the case of a wide-display device(tablet devices), our application uses a single activity containing two fragments. One fragment displays the list of book titles, and the other fragment displays the description of the currently selected book. As both of these fragments appear onscreen at the same time, we display and manage them from a single activity.
However, in the case of a portrait-oriented handset, we chose to display the book list and the book description on separate screens. The reason for this is that the two fragments do not appear onscreen at the same time; we manage them in separate activities and each activity containing one fragment.
Surprisingly, in both cases our application performed the same task. The only difference is how much information we were able to display onscreen at one time. That one detail caused us to add an extra activity to our application. We also increased the complexity of our application because the code to launch a new activity is more involved than the code we use to simply update a fragment within the same activity. Also, we duplicated code in the activities because they both interact with the book description fragment.
If we recall, we learnt that one of the key values of fragments is that they help reduce unnecessary complications, activity proliferation, and logic duplication. Yet, as the application is currently written, we’re experiencing all of these things.
—->>>
We need to evolve our thinking about UI design a little further.
Rather than simply using fragments to manage logical subsections of the screen, we can also use them to manage logical groupings of an entire screen. We can then dynamically manage the fragments within a single activity to change from one fragment to another.
Dynamically Managing Fragments
The process of dynamically managing fragments commonly involves multiple steps.
The steps may be as simple as removing one fragment and adding another, or they may be more complex, involving the removal and addition of multiple fragments.
In any case, we need to be certain that all dynamic changes to the fragments within an activity that constitute a shift from one application screen to the next occur together as a single unit of work. Android does this by grouping the steps into transactions using the FragmentTransaction class.
Make sure, dynamic changes occur together as a single unit of work –> FragmentTransaction class helps.
Conceptually, the FragmentTransaction class behaves in a manner consistent with other transaction models:
- Start the transaction.
- Identify the desired changes.
- Commit the transaction once all changes within this unit of work are identified.
Start a new FragmentTransaction instance:
We will start a new FragmentTransaction instance by calling the beginTransaction method on the activity’s FragmentManager instance, which returns a reference to the FragmentTransaction instance. We will then use the new FragmentTransaction instance to identify the desired changes to the list of displayed fragments within the activity. While we’re in the transaction, these changes will be queued up but not yet applied. Finally, when we identify all the desired changes, we will call the FragmentTransaction class’ commit method.
// Begin the transaction
FragmentManager fm = getFragmentManager();
FragmentTransaction ft = fm.beginTransaction();

......

// Commit the changes
ft.commit();
Once all the changes in the transaction are applied, our application display is updated to reflect these changes, giving the user the feel of moving to a new screen within our application.
Deferred execution of transaction changes:
The call to the commit method does not apply the changes immediately. –> Deferred execution.
When we work with the FragmentTransaction class, we do not do any direct work on the application user interface. Instead, we build a list of work to be done on the user interface in the future.
Each method that we call on a FragmentTransaction instance adds another to-do item to the list. When we’re done adding to the to-do list and we call the commit method, this list of to-do items gets packaged up and sent to the main UI thread’s message queue.
—>>> commit() resolves in the main UI thread. The UI thread then walks through the list, performing the actual user interface work on behalf of the FragmentTransaction instance.
Note: As the method calls to the FragmentTransaction instance do not directly affect the user interface, an application can safely make these calls on a non-UI thread. Complex applications can take advantage of this fact to provide a more responsive user experience by performing work related to FragmentTransaction in the background when necessary.
[**** Problem ****]
The deferred execution of the work performed within a FragmentTransaction instance works well in most cases. It can, however, create problems if our application code needs to find a fragment, or interact with a view that is added by a fragment, immediately following the call to the commit method.
[ Solution ]
We can force the FragmentTransaction instance’s work to be executed immediately by calling the FragmentManager class’ executePendingTransactions method after the call to the FragmentTransaction instance’s commit method.
When a call to the executePendingTransactions method returns, we know that all the committed FragmentTransaction work is performed.
We need to be careful by only calling the executePendingTransactions method on the main UI thread; this method causes the pending user interface work to execute and therefore triggers direct interaction with the user interface.
Adding and Removing Fragments
The add method allows us to place a newly created fragment instance within a specific view group of our activity, as shown here:
// Begin the transaction
FragmentManager fm = getFragmentManager();
FragmentTransaction ft = fm.beginTransaction();

// Create the Fragment and add
BookListFragment2 listFragment = new BookListFragment2();
ft.add(R.id.layoutRoot, listFragment, "bookList");

// Commit the changes
ft.commit();
- We will first create a new
FragmentTransactioninstance using the activity’sFragmentManagerinstance. - We will then create a new instance of our
BookListFragment2class and attach it to the activity as a child of theLinearLayoutview group identified by theR.id.layoutRootID value. - Finally, we will commit the
FragmentTransactioninstance, indicating that we’re done making changes. - The string value
bookList, which we will pass as the third parameter to theaddmethod, is simply a tag value. We can use the tag value to later locate the fragment instance in much the same way as we might use theidvalue. When adding fragments dynamically, we will use tags as identifiers rather thanidvalues, simply because there is no way to associate anidvalue with a dynamically added fragment.
Note:
Fragments can be dynamically added to any layout element that derives from ViewGroup. Much of the example code you are likely to encounter uses FrameLayout for this purpose.
—->>>> Most of the examples use FrameLayout for holding dynamically added Fragment.
The tag value comes in handy when we are ready to display a different fragment. Here, we need to have a reference to the existing fragment to pass to the remove method so that we can remove it before adding a new fragment.
The following code shows how we can update the display to show the BookDescFragment class in place of the BookListFragment2 class we added in the previous code:
FragmentManager fm = getFragmentManager();
Fragment listFragment = fm.findFragmentByTag("bookList");
BookDescFragment bookDescFragment = new BookDescFragment();
FragmentTransaction ft = fm.beginTransaction();
ft.remove(listFragment);
ft.add(R.id.layoutRoot, bookDescFragment, "bookDescription");
ft.commit();
- We will begin by using the tag value to find our existing
BookListFragment2instance using theFragmentManagerclass’findFragmentByTagmethod. - We will then create an instance of the new fragment we wish to add.
- Now that we have references to the fragment we want to remove and the one we want to add, we will begin the fragment transaction.
- Within the transaction, we will remove the
BookListFragment2instance by passing the reference to theFragmentTransactionclass’removemethod and - then add the new fragment using the
addmethod, just as we did earlier. - Finally, we will call the
commitmethod to allow the changes to be made.
This process of removing the fragment instance under a particular view group and adding another in its place occurs frequently enough for the FragmentTransaction class to include a convenience method named replace.
The replace method allows us to simply identify the information for the fragment we wish to add.
replace() method takes care of the details of removing any other fragments that may exist within the target view group.
Using the replace method, the code to remove the BookListFragment2 instance and add the BookDescFragment instance can be written as follows:
FragmentManager fm = getFragmentManager();
bookDescFragment = new BookDescFragment();
FragmentTransaction ft = fm.beginTransaction();
ft.replace(R.id.layoutRoot, bookDescFragment, "bookDescription");
ft.commit();
Note that this code, with the exception of the replace method name, is identical to the case of adding a fragment.
We will create our fragment instance, and then within the FragmentTransaction instance, we will call the replace method by passing the IDs of the target view group, fragment instance, and tag.
—->>>>
The replace method handles the details of removing any fragment that may currently be within the R.id.layoutRoot view group. It then adds the BookDescFragment instance to the view group.
replace () –> remove() + add()
Supporting the back button
When a user interacts with the applications on their device, they naturally move forward through various application screens.
The normal behavior is that a user can move back to a previous screen at any time by tapping the back button. This works because, each time an application displays a new activity, Android automatically adds this activity to the Android back stack. This results in the expected behavior of the user moving to the previous activity with each tap of the back button.
[Problem]
This behavior is based on the assumption that one activity equals one application screen—an assumption that is no longer correct due to our dynamic management of screens as fragments.
When we transition the user from one application screen to another using the FragmentTransaction class, the application continues to display the same activity, leaving the back stack with no awareness of our application’s new screen. This results in the application appearing to jump back multiple screens in response to the user tapping the back button because the back stack returns the user directly to the previous activity, ignoring any intermediate changes made to the current activity.
The following figure demonstrates the issue:
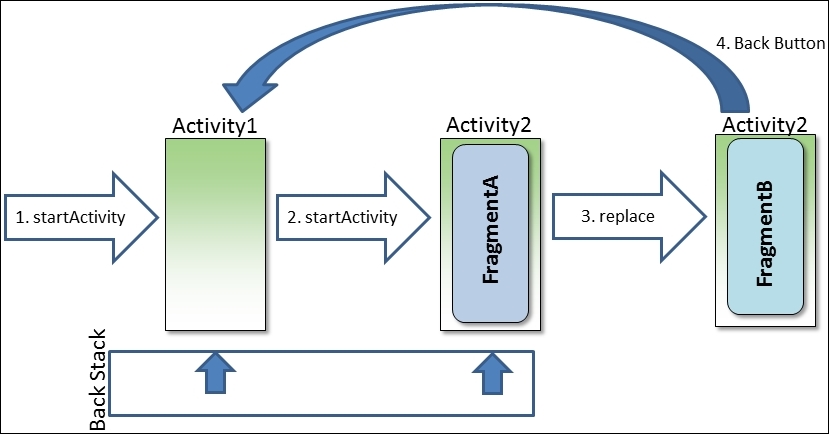
The following is the explanation of the preceding figure:
- An application initially calls the
startActivitymethod to display an instance ofActivity1.Activity1is automatically added to the back stack and is currently at the top of the stack. Activity1then calls thestartActivitymethod to displayActivity2,which uses theFragmentTransaction.addmethod to addFragmentA.Activity2is automatically added to the top of the back stack.- Next,
Activity2uses theFragmentTransaction.replacemethod to displayFragmentBin place ofFragmentA. As far as the user is concerned, the application displays a new screen showing the contents ofFragmentB. The problem is that the back stack is unchanged. - When the user now taps the back button, his/her expectation is that the app should display the previous screen,
FragmentA; Instead, when Android pops the back stack, the next screen it encounters isActivity1.
[Solution] – addToBackStack() method
We resolve this issue by calling the FragmentTransaction class’ addToBackStack method within the FragmentTransaction instance that displays FragmentB.
The addToBackStack method adds the changes within the transaction to the top of the back stack. This allows the user to use the back button to move through the application screens created within the FragmentTransaction instance just as one does with the screens created by showing an activity.
- We can call the
addToBackStackmethod at any point during the transaction prior to calling thecommitmethod. - The
addToBackStackmethod optionally accepts a string parameter that can be used to name the location in the back stack. This is useful if you wish to programmatically manipulate the back stack later, but in most cases this parameter value can be passed as null.
Note:
If your activity is derived from AppCompatActivity, you will need to call getSupportFragmentManager to be able to create transactions that properly support addToBackStack. When deriving from AppCompatActivity, calls to addToBackStack on a transaction created with the standard FragmentManager silently fail.
Creating an adaptive application layout
Let’s put our theory of dynamic fragment management into practice by updating our Books application to work with just a single activity.
This one activity will handle both scenarios:
- wide-display devices, where both fragments appear side-by-side, and
- portrait-oriented handsets, where the fragments appear as two separate screens in Single Activity.
The application appears as shown in the following screenshot in each scenario:

In our application, we’ll leave the wide-display aspect of the program alone because static layout management works fine here.
Our work is on the portrait-oriented handset aspect of the application. For these devices, we’ll update the application’s main activity to dynamically switch between displaying the fragment containing the list of books and the fragment displaying the selected book description.
Step 1: Updating the layout to support dynamic fragments
Before we write any code to dynamically manage the fragments within our application, we first need to modify the activity layout resource for portrait-oriented handset devices. This resource is contained in the activity_main.xml layout resource file that is not followed by (land) or (600dp). The layout resource currently appears as shown here:
<LinearLayout
  xmlns:tools="http://schemas.android.com/tools"
  android:orientation="vertical"
  android:layout_width="match_parent"
  android:layout_height="match_parent"
  xmlns:android="http://schemas.android.com/apk/res/android">
  <!--    List of Book Titles  -->
  <fragment
    android:layout_width="match_parent"
    android:layout_height="0dp"
    android:layout_weight="1"
    android:name="com.jwhh.fragments.BookListFragment2"
    android:id="@+id/fragmentTitles"
    tools:layout="@layout/fragment_book_list"/>
</LinearLayout>
We need to make two changes to the layout resource.
- The first is to add an
idattribute to theLinearLayoutview group so that we can easily locate it in code. - The other change is to completely remove the
fragmentelement.
The updated layout resource now contains only the LinearLayout view group, which includes an id attribute value of @+id/layoutRoot. The layout resource now appears as shown here:
<LinearLayout
  android:id="@+id/layoutRoot"
  android:orientation="vertical"
  android:layout_width="match_parent"
  android:layout_height="match_parent"
  xmlns:android="http://schemas.android.com/apk/res/android">
</LinearLayout>
We still want our application to initially display the book list fragment, so removing the fragment element may seem like a strange change; however, doing so is essential as we will move our application to dynamically manage the fragments.
We will eventually need to remove the book list fragment to replace it with the book description fragment. If we were to leave the book list fragment in the layout resource, our attempt to dynamically remove it later would silently fail.
Note:
Only dynamically added fragments can be dynamically removed. Attempting to dynamically remove a fragment that was statically added with the fragment element in a layout resource will silently fail.
Step 2 : Adapting to device differences :
When our application runs on a portrait-oriented handset device, the activity needs to programmatically load the fragment containing the book list. Initially, the book list fragment is loaded with the fragment element in the activity_main.xml layout resource file.
Before we load the book list fragment dynamically, we first need to determine whether we’re running on a device that requires dynamic fragment management. Remember that, for wide-display devices, we are using the static fragment management.
There will be a couple of places in our code where we’ll need to take different logic paths depending on which layout we use, so we’ll need to add a boolean class-level field to the MainActivity class in which we can store whether we’re using dynamic or static fragment management. Take a look at the following:
boolean mIsDynamic;
We could interrogate the device for its specific characteristics, such as screen size and orientation. However, remember that much of our previous work was to configure our application to take advantage of the Android resource system to automatically load the appropriate layout resources based on the device characteristics.
Rather than repeating these characteristic checks in code, we can simply include the code to determine which layout resource was loaded instead. –> check which layout resource was loaded.
The layout resource for wide-display devices we created earlier—that is, activity_main_wide.xml—statically loads both the book list fragment and the book description fragment. We can include in our activity’s onCreate method code to determine whether the loaded layout resource includes one of these fragments, as shown here:
public class MainActivity extends Activity implements OnSelectedBookChangeListener {
    boolean mIsDynamic;

    @Override
    protected void onCreate(Bundle savedInstanceState) {
        super.onCreate(savedInstanceState);
        setContentView(R.layout.activity_main);

        // Get the book description fragment
        FragmentManager fm = getFragmentManager();
        Fragment bookDescFragment = fm.findFragmentById(R.id.fragmentDescription);

        // If not found than we're doing dynamic mgmt
        mIsDynamic = ((bookDescFragment == null) || !bookDescFragment.isInLayout());

        // Load the list fragment if necessary
        if (mIsDynamic) {

            // load list fragment dynamically
        }
    }
}
- When the call to the
setContentViewmethod returns, we will know that the appropriate layout resource for the current device is loaded. - We will then use the
FragmentManagerinstance to search for the fragment with anidvalue ofR.id.fragmentDescriptionthat is included in the layout resource for wide-display devices but not the layout resource for portrait-oriented handsets. - A return value of
nullindicates that the fragment was not loaded and we are, therefore, on a device that requires us to dynamically manage the fragments.
—–>>>> In addition to the test for null, we will also include the call to theisInLayoutmethod to protect against one special case scenario.
In the scenario where the device is in a landscape layout and then rotated to portrait, a cached instance to the fragment identified by R.id.fragmentDescription may still exist, even though the activity does not use the fragment in the current orientation.
By calling the isInLayout method, we’re able to determine whether the returned reference is part of the currently loaded layout. With this, our test to set the mIsDynamic member variable effectively says that we’ll set mIsDynamic to true when the R.id.fragmentDescription fragment is not found (which equals null), or it is found but is not part of the currently loaded layout (that is,!bookDescFragment.isInLayout).
Step 3 : Dynamically loading fragment at startup :
Now that we’re able to determine whether dynamically loading the book list fragment is necessary, we will add the code to do so to our onCreate method, as shown here:
protected void onCreate(Bundle savedInstanceState) {
    super.onCreate(savedInstanceState);
    setContentView(R.layout.activity_main);

    // Get the book description fragment
    FragmentManager fm = getFragmentManager();
    Fragment bookDescFragment = fm.findFragmentById(R.id.fragmentDescription);

    // If not found than we're doing dynamic mgmt
    mIsDynamic = bookDescFragment == null || !bookDescFragment.isInLayout();

    // Load the list fragment if necessary
    if (mIsDynamic) {
        // Begin transaction
        FragmentTransaction ft = fm.beginTransaction();

        // Create the Fragment and add
        BookListFragment2 listFragment = new BookListFragment2();
        ft.add(R.id.layoutRoot, listFragment);

        // Commit the changes
        ft.commit();
    }
}
Step 4 : Transitioning between fragments
Whenever the user selects a book title within the book list fragment, the fragment notifies the main activity by calling the MainActivity.onSelectedBookChanged method and passing the index of the selected book.
In the current implementation, we will try to find the book description fragment within the currently loaded layout. If we find it, we will know that the current layout includes the fragment, and we will go ahead and set the book description directly on the fragment. If we don’t find it, we will call the startActivity method to display the activity that does contain the book description fragment.
But now, we don’t want to start new Activity, instead we want to transition from list fragment to description fragment within the same activity.
Creating the fragment on the fly
FragmentTransaction ft = fm.beginTransaction();
bookDescFragment = new BookDescFragment();
ft.replace(R.id.layoutRoot, bookDescFragment, "bookDescription");
ft.addToBackStack(null);
ft.setCustomAnimations(android.R.animator.fade_in, android.R.animator.fade_out);
ft.commit();
Within FragmentTransaction, we will create an instance of the BookDescFragment class and call the replace method, passing the ID of the same view group that contains the BookListFragment2 instance that we added in the onCreate method. We will include a call to the addToBackStack method so that the back button functions correctly, allowing the user to tap the back button to return to the book list.
Note: The code includes a call to the FragmentTransaction class’ setCustomAnimations method, which creates a fade effect when the user switches from one fragment to the other.
**** Managing asynchronous creation
We have one final challenge, which is to set the book index on the dynamically added book description fragment. Our initial thought might be to simply call the BookDescFragment class’ setBook method after we create the BookDescFragment instance, but let’s first take a look at the current implementation of the setBook method. The method currently appears as follows:
public void setBook(int bookIndex) {
  // Lookup the book description
  String bookDescription = mBookDescriptions[bookIndex];

  // Display it
  mBookDescriptionTextView.setText(bookDescription);
}
The last line of the method attempts to set the value of mBookDescriptionTextView within the fragment, which is a problem.
Remember that the work we do within a FragmentTransaction class is not immediately applied to the user interface. (Deferred execution of Fragment transaction).
——->>>>
The work within the Fragment transaction is performed sometime after the completion of the call to the commit method. Therefore, the BookDescFragment instance’s onCreate and onCreateView methods are not yet called. As a result, any views associated with the BookDescFragment instance are not yet created. An attempt to call the setText method on the BookDescriptionTextView instance will result in a null reference exception.
[Solution]
The Fragment base class includes a method called setArguments.
With the setArguments method, we can attach data values, which are otherwise known as arguments to the fragment that can then be accessed later in the fragment life cycle using the getArguments method.
To simplify the process of creating the fragment instance and to pass data values or arguments to a dynamically created fragment :
To simplify the process of creating the fragment instance and to pass data values or arguments to a dynamically created fragment, we’ll add a static factory method named newInstance to the fragment class that appears as follows :
public static BookDescFragment newInstance(int bookIndex) {
    BookDescFragment fragment = new BookDescFragment();
    Bundle args = new Bundle();
    args.putInt(BOOK_INDEX, bookIndex);
    fragment.setArguments(args);
    return fragment;
}
- The
newInstancemethod starts by creating an instance of theBookDescFragmentclass. - It then creates an instance of the
Bundleclass, stores the book index in theBundleinstance, and - then uses the
setArgumentsmethod to attach it to theBookDescFragmentinstance. - Finally, the
newInstancemethod returns theBookDescFragmentinstance.
—->>>>
Accordingly, we need to update the fragment class’ onCreateView method to look for arguments that might be attached to the fragment. We will call the getArguments method to retrieve any arguments that might be attached. The arguments are returned as an instance of the Bundle class.
@Override
public View onCreateView(LayoutInflater inflater, ViewGroup container, Bundle savedInstanceState) {

    View viewHierarchy = inflater.inflate(R.layout.fragment_book_desc, container, false);

    // Load array of book descriptions
    mBookDescriptions = getResources().getStringArray(R.array.book_descriptions);

    // Get reference to book description text view
    mBookDescriptionTextView = (TextView) viewHierarchy.findViewById(R.id.bookDescription);

    // Retrieve the book index if attached
    Bundle args = getArguments();
    int bookIndex = args != null ? args.getInt(BOOK_INDEX, BOOK_INDEX_NOT_SET) : BOOK_INDEX_NOT_SET;

    // If we find the book index, use it
    if (bookIndex != BOOK_INDEX_NOT_SET)
        setBook(bookIndex);

    return viewHierarchy;
}
With the BookDescFragment class now including support for attaching the book index as an argument, we’re ready to fully implement the main activity’s onSelectedBookChanged method to include switching to the BookDescFragment instance and attaching the book index as an argument. The method now appears as follows:
public void onSelectedBookChanged(int bookIndex) {
    BookDescFragment bookDescFragment;
    FragmentManager fm = getFragmentManager();

    // Check validity of fragment reference
    if (mIsDynamic) {
        // Handle dynamic switch to description fragment
        FragmentTransaction ft = fm.beginTransaction();

        // Create the fragment and pass the book index
        bookDescFragment = BookDescFragment.newInstance(bookIndex);

        // Replace the book list with the description
        ft.replace(R.id.layoutRoot, bookDescFragment);
        ft.addToBackStack(null);
        ft.setCustomAnimations(android.R.animator.fade_in, android.R.animator.fade_out);
        ft.commit();
    } else {
        // Use the already visible description fragment
        bookDescFragment = (BookDescFragment)fm.findFragmentById(R.id.fragmentDescription);
        bookDescFragment.setBook(bookIndex);
    }
}
Just as before, we will start by checking whether we’re doing dynamic fragment management. Once we determine we are, we will start the FragmentTransaction instance and create the BookDescFragment instance. We will then create a new Bundle instance, store the book index into it, and then attach the Bundle instance to the BookDescFragment instance with the setArguments method. Finally, we will put the BookDescFragment instance into place as the current fragment, take care of the back stack, enable animation, and complete the transaction.
